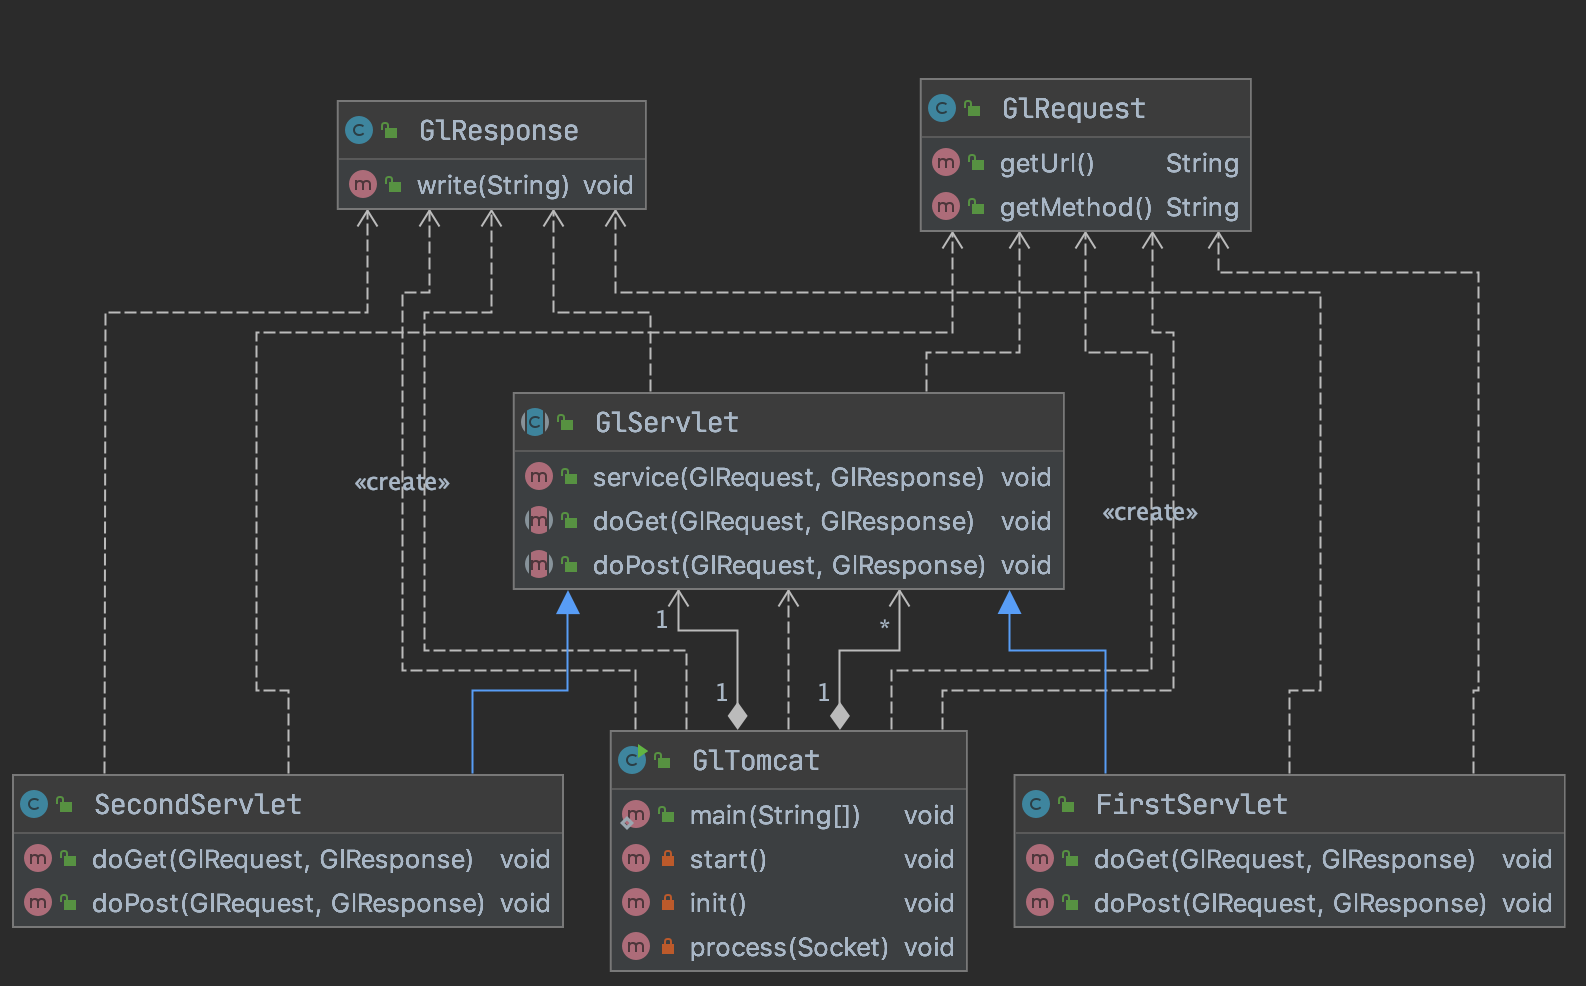
基于传统的BIO手写一个简易Tomcat
本文主要基于传统的BIO来实现一个简单的Http请求处理过程;
1、Servlet请求无非就是doGet/doPost,所以我们定义抽象Servlet记忆GET/POST方法;
2、基于Socket和ServerSocket实现CS通信;
3、模拟Spring加载配置文件,注册请求以及控制器;

GlRequest 封装一个请求
当然是一个很简单的请求,这里只处理请求的URL和请求方法;
获取请求,也就是输入流,解析数据Url和Method,并做相应的处理;
1
2
3
4
5
6
7
8
9
10
11
12
13
14
15
16
17
18
19
20
21
22
23
24
25
26
27
28
29
30
31
| public class GlRequest {
private String url;
private String method;
public GlRequest(InputStream is) {
try {
String content = "";
byte[] buff = new byte[1024];
int len = 0;
if ((len = is.read(buff)) > 0) {
content = new String(buff, 0, len);
}
String line = content.split("\\n")[0];
String [] arr = line.split("\\s");
this.method = arr[0];
this.url = arr[1].split("\\?")[0];
} catch (IOException e) {
e.printStackTrace();
}
}
public String getUrl() {
return this.url;
}
public String getMethod() {
return this.method;
}
}
|
GlResponse 定义返回值response
处理请求返回值,将业务处理的结果通过输出流输出;
输出大致分为两部分,第一是返回的数据,第二是返回数据的Header;
1
2
3
4
5
6
7
8
9
10
11
12
13
14
15
16
17
| public class GlResponse {
private OutputStream outputStream;
public GlResponse(OutputStream os) {
this.outputStream = os;
}
public void write(String string) throws Exception {
StringBuffer sb = new StringBuffer();
sb.append("HTTP/1.1 200 OK\n")
.append("Content-Type: text/html;\n")
.append("\r\n")
.append(string);
outputStream.write(sb.toString().getBytes());
}
}
|
GlServlet 定义抽象servlet,定义GET方法和POST方法
定义抽象的Servlet和doGet方法和doPost方法,具体的业务去实现自己的方法和逻辑;
1
2
3
4
5
6
7
8
9
10
11
12
13
14
15
16
| public abstract class GlServlet {
private final static String GET = "GET";
public void service(GlRequest request, GlResponse response) throws Exception {
if (GET.equals(request.getMethod())) {
doGet(request, response);
} else {
doPost(request, response);
}
}
public abstract void doGet(GlRequest request, GlResponse response) throws Exception;
public abstract void doPost(GlRequest request, GlResponse response) throws Exception;
}
|
FirstServlet 具体的业务Servlet实现抽象Servlet的方法
1
2
3
4
5
6
7
8
9
10
11
12
13
| public class FirstServlet extends GlServlet {
@Override
public void doGet(GlRequest request, GlResponse response) throws Exception {
this.doPost(request, response);
}
@Override
public void doPost(GlRequest request, GlResponse response) throws Exception {
response.write("This is first servlet from BIO");
}
}
|
SecondServlet 具体的业务Servlet实现抽象Servlet方法
1
2
3
4
5
6
7
8
9
10
11
12
| public class SecondServlet extends GlServlet {
@Override
public void doGet(GlRequest request, GlResponse response) throws Exception {
doPost(request,response);
}
@Override
public void doPost(GlRequest request, GlResponse response) throws Exception {
response.write("This second request form BIO");
}
}
|
web-bio.properties 配置文件
配置请求和处理器,Spring中是通过Controller下的@XXXMapping注解去扫描并加载到工厂的;
1
2
3
4
5
| servlet.one.className=com.ibli.netty.tomcat.bio.servlet.FirstServlet
servlet.one.url=/firstServlet.do
servlet.two.className=com.ibli.netty.tomcat.bio.servlet.SecondServlet
servlet.two.url=/secondServlet.do
|
GlTomcat测试类
启动服务端,在网页中访问本地8080端口,输入配置文件中定义的url进行测试:
1
2
3
4
5
6
7
8
9
10
11
12
13
14
15
16
17
18
19
20
21
22
23
24
25
26
27
28
29
30
31
32
33
34
35
36
37
38
39
40
41
42
43
44
45
46
47
48
49
50
51
52
53
54
55
56
57
58
59
60
61
62
63
64
65
66
67
68
69
70
71
72
73
74
75
76
77
78
79
80
81
82
83
84
85
86
87
88
89
90
91
92
93
94
95
96
97
98
99
100
101
102
103
104
| public class GlTomcat {
private ServerSocket server;
private final Integer PORT = 8080;
private Properties webXml = new Properties();
private Map<String, GlServlet> servletMapping = new HashMap<String, GlServlet>();
public static void main(String[] args) {
new GlTomcat().start();
}
private void start() {
init();
try {
server = new ServerSocket(this.PORT);
System.err.println("Gl tomcat started in port " + this.PORT);
while (true) {
Socket client = server.accept();
process(client);
}
} catch (Exception e) {
e.printStackTrace();
}
}
private void init() {
try {
String WEB_INF = this.getClass().getResource("/").getPath();
FileInputStream fis = new FileInputStream(WEB_INF + "web-bio.properties");
webXml.load(fis);
for (Object k : webXml.keySet()) {
String key = k.toString();
if (key.endsWith(".url")) {
String servletName = key.replaceAll("\\.url", "");
String url = webXml.getProperty(key);
String className = webXml.getProperty(servletName + ".className");
GlServlet obj = (GlServlet) Class.forName(className).newInstance();
servletMapping.put(url, obj);
}
}
} catch (Exception e) {
e.printStackTrace();
}
}
private void process(Socket client) throws Exception {
InputStream is = null;
OutputStream os = null;
try {
is = client.getInputStream();
os = client.getOutputStream();
GlRequest request = new GlRequest(is);
GlResponse response = new GlResponse(os);
String url = request.getUrl();
if (servletMapping.containsKey(url)) {
servletMapping.get(url).service(request, response);
} else {
response.write("404 Not found!");
}
} catch (Exception e) {
e.printStackTrace();
} finally {
if (os != null) {
os.flush();
os.close();
}
if (is != null) {
is.close();
client.close();
}
}
}
}
|
打印请求信息
1
2
3
4
5
6
7
8
9
10
11
12
| Request content : GET /fitstServlet.do HTTP/1.1
Host: localhost:8080
Connection: keep-alive
Upgrade-Insecure-Requests: 1
User-Agent: Mozilla/5.0 (Macintosh; Intel Mac OS X 10_14_5) AppleWebKit/537.36 (KHTML, like Gecko) Chrome/88.0.4324.150 Safari/537.36 OPR/74.0.3911.160
Accept: text/html,application/xhtml+xml,application/xml;q=0.9,image/avif,image/webp,image/apng,*
|
客户端发送请求及结果展示
请求: http://localhost:8080/firstServlet.do


